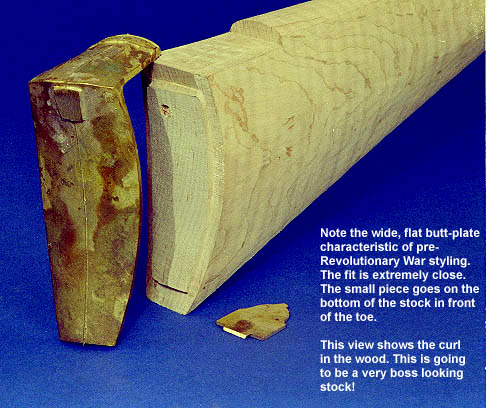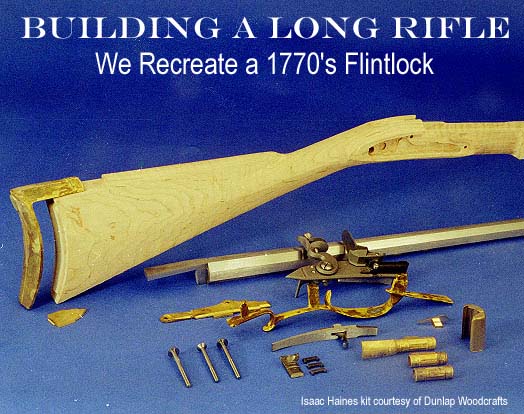
Building Your Own Flintlock Kentucky Rifle: Part One Okay, we'll admit it: this series is probably a little esoteric for a lot of folks. But, if you have the slightest interest in Neat Sh-t, hang in there. This is really a fun, relatively easy project that results in an artifact that even your significant other would like to have hanging on the wall. Besides that, they are so much fun to shoot you won't be able to stand yourself. If you haven't been exposed to black powder shooting before, you probably have some questions about their safety. The answer is that, yes they are safe. Treat them exactly as you would any other firearm with just a little more caution attached to handling the raw powder. We'll get into that in some detail when we get ready to go shooting. The Project We selected an Isaac Haines style because I like his crisp architecture and general lines. His butt stock is typical Lancaster, with straight lines top and bottom, but he rendered them in a tighter style. Also, I like the just-barely-pre-Revolutionary War styling in general, with the flatter, wider butt plate. This will be the first kit I've assembled, as I usually cut my stocks from a board, doing all the shaping myself, which is a long tedious task. Just inletting the barrel is good for 40 hours plus because each flat of the octagon changes dimension as you move up the barrel channel. Unless you're really serious about it, the kit looks like the way to go. It's a little more expensive, but won't drag on nearly as long. As I'm writing this, I'm guessing it'll take about 60 hours to finish the rifle, not counting carving. I'll keep rough track of the time involved and we'll see how that works out in the end.

The Kit One of the primary reasons we decided on a Dunlap kit is that it uses the best components available and Dunlap's reputation for parts fit is unquestioned. Most of his inlet mortises are so close to being the right size, they require removing the only tiniest amount of wood. Also, it makes no sense to put this amount of effort into a project and use second quality parts and material. You'll see lots of kits at a much lower cost, but you won't see any better. Dunlap's kits run in the $600-$800 range. You'll also see kits in the $200 range that are usually made in Italy or Japan. Ignore those. Every aspect of them is questionable yet it takes the same amount of time to finish. Curly maple is available in a wide range of quality which generally means the more curl and the tighter the curl, the more valuable the wood is. Expect to pay $225 and up for a premium piece of wood which will be around $350+ by the time it has been machined into a semi-finished stock. A straight grained piece of wood would be about $100; it's not worth saving that amount of money considering the time and quality of the finished product. Incidentally, the wood is nearly white in its natural state, but is stained prior to finishing to bring out the curly grain. The "curls" are grain reversals so the end grain soaks up the stain better and the light/dark stripes stand out. It's really cool to watch that happen while you're staining. Then, when you hit it with the first coat of finish and the grain leaps out at you, you remember why you started this project in the first place. Dunlap uses Getz barrels which are usually the choice of most serious builders, but there are at least a half dozen good barrel makers out there. I've never used any other kind. The lock in the kit is a Siler, which is also the standard by which other locks are measured. Again, there are probably a dozen or more locks available, but the Siler works well so why not use it? Also, the shape of long rifle lock plates and the hammer changed significantly after 1800 and in different regions. The Siler shape is more or less correct to the 1770 period in the Lancaster, PA area. As you'll see in the pictures, I'm going to set the rifle up to use both flint ignition and the much later (and historically incorrect) percussion cap ignition. When the cap lock was invented in the mid-1830's, a vast majority of the older flint guns were converted because the newer lock was so much faster and more reliable. All of the brass parts (buttplate, trigger guard, etc.) are wax cast, rather than sand cast, so they are quite smooth and only require minor finishing. The sprue has to be cut off and the edges and joint seam dressed down.
The Tools Of critical importance is a set of small carving chisels including a flat chisel around 1/8" across and a reasonably small gouge. Most of the work could be done with a 1/4" chisel, but a gouge is absolutely necessary to work the insides of the lock recess. Along with the chisels should come several sharpening stones, down to the finest grit available. Then make a leather strop by gluing some belt leather to a block of wood and work some rubbing compound into its surface. There is simply no substitute for sharp tools on a project like this. None whatsoever. You'll also see me using some black stuff as a color transfer to see where the parts are touching the wood so I know what has to be cut away. Lip stick works just as well and is easier to find. One gadget you may want to purchase is a little specially made vice
to compress the main spring, in case you want to disassemble the
lock to better work on it. See the article on long rifles elsewhere
in Airbum.com to get the address to join the National Muzzle Loading
Association. Their magazine is full of suppliers.
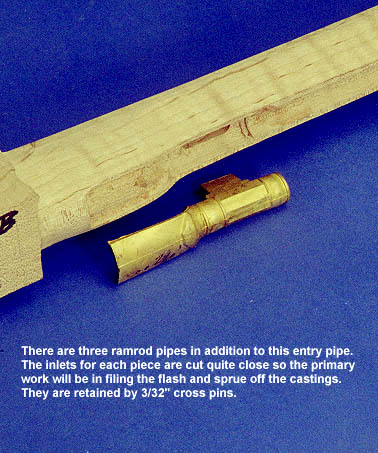
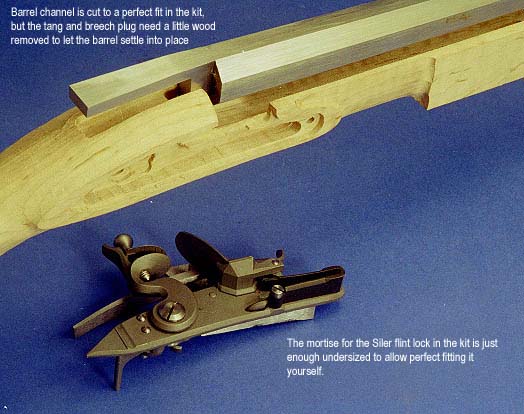
The Steps 1. Finish inletting barrel tang so the barrel can get set solid in stock. This has to be done before finish inletting the lock to get the touch hole for ignition in the right place. 2. Finish inletting lock. 3. Inlet trigger plate 4. drill and tap for tang and lock bolts. 5. Inlet buttplate and drill for mounting screws 6. Install under-barrel lugs and drill stock for pins 7. Inlet trigger guard and drill for mounting pins 8. Inlet ramrod tubes and drill for mounting pins 9. Inlet muzzle cap 10. Cut dovetails for sights 11. Sand stock down to final shape and prepare for finish 12. Carve designs on stock. We'll make up our mind whether to do that, when we get to that point. 13. Stain stock and rub finish on. This is the really fun part because it starts to look like a real rifle. 14. Prep metal parts for "browning." They aren't blued, but browned. 15. Go out and burn a little powder. Yeehah!! See the following for progress reports: And here's a little discussion on Pennsylvania rifles in general. The Pennsylvania Rifle -- An American Icon And for other really cool stuff, go to Neat Sh*t.
|